Window replacement installation is a process that Augusta homeowners often approach with uncertainty — not knowing how long it will take, how disruptive it will be, or what to expect at each stage. The reality is that a professional window replacement is a well-sequenced process that most Augusta homeowners find less disruptive than they anticipated. Here is a clear account of what happens from the estimate visit through to the final walkthrough.
Before Installation Day — The Estimate Visit
Every Augusta Window Pros installation begins with an in-home estimate visit. This is not a sales call — it is a working assessment of every window opening in your home. We measure each opening precisely, assess the condition of the existing frames and sills, identify which openings are candidates for insert replacement and which need full-frame installation, and discuss window styles and glass packages that suit your home and budget.
The estimate visit is where the scope of the job is established. If rot or water damage is present at any frame, we identify it here — not on installation day. If any opening has a structural consideration — an oversized bay window, a non-standard rough opening dimension, a header that needs reinforcement — we flag it during the estimate and factor it into the written quote. The written quote you receive after the estimate covers everything that was visible and assessable during the visit. There are no additions on installation day for work that was apparent during the estimate.
Ordering and Lead Time
Replacement windows for Augusta homes are ordered to the specific dimensions measured during the estimate visit. Standard residential windows — double hung, casement, sliding — typically have a lead time of two to four weeks from order to delivery. Bay and bow windows, which involve more complex manufacturing, may run four to six weeks. We confirm the lead time with you when the order is placed so you can plan accordingly.
Preparing for Installation Day
There is limited preparation required from Augusta homeowners before the installation team arrives. The practical steps that make installation day go smoothly:
- Clear the area around each window inside the home — move furniture back from window walls, remove items from sills, and take down window treatments (blinds, curtains, shutters)
- Identify a parking area close to the home for the installation vehicle — we carry the new windows and tools from the vehicle to the home throughout the day
- If pets are in the home, keep them in a room away from the work areas — open window openings during installation are a safety concern for animals
- Plan to be home for the full installation day — we need access to each room and a walkthrough at completion
We handle all protective covering of interior floors and surfaces adjacent to the work areas. You do not need to cover furniture or flooring beyond moving items away from the immediate window area.
The Installation Sequence — What Happens Room by Room
Augusta Window Pros works through the home room by room, completing each window fully before moving to the next. The sequence for each window is:
Step 1 — Remove the Existing Window
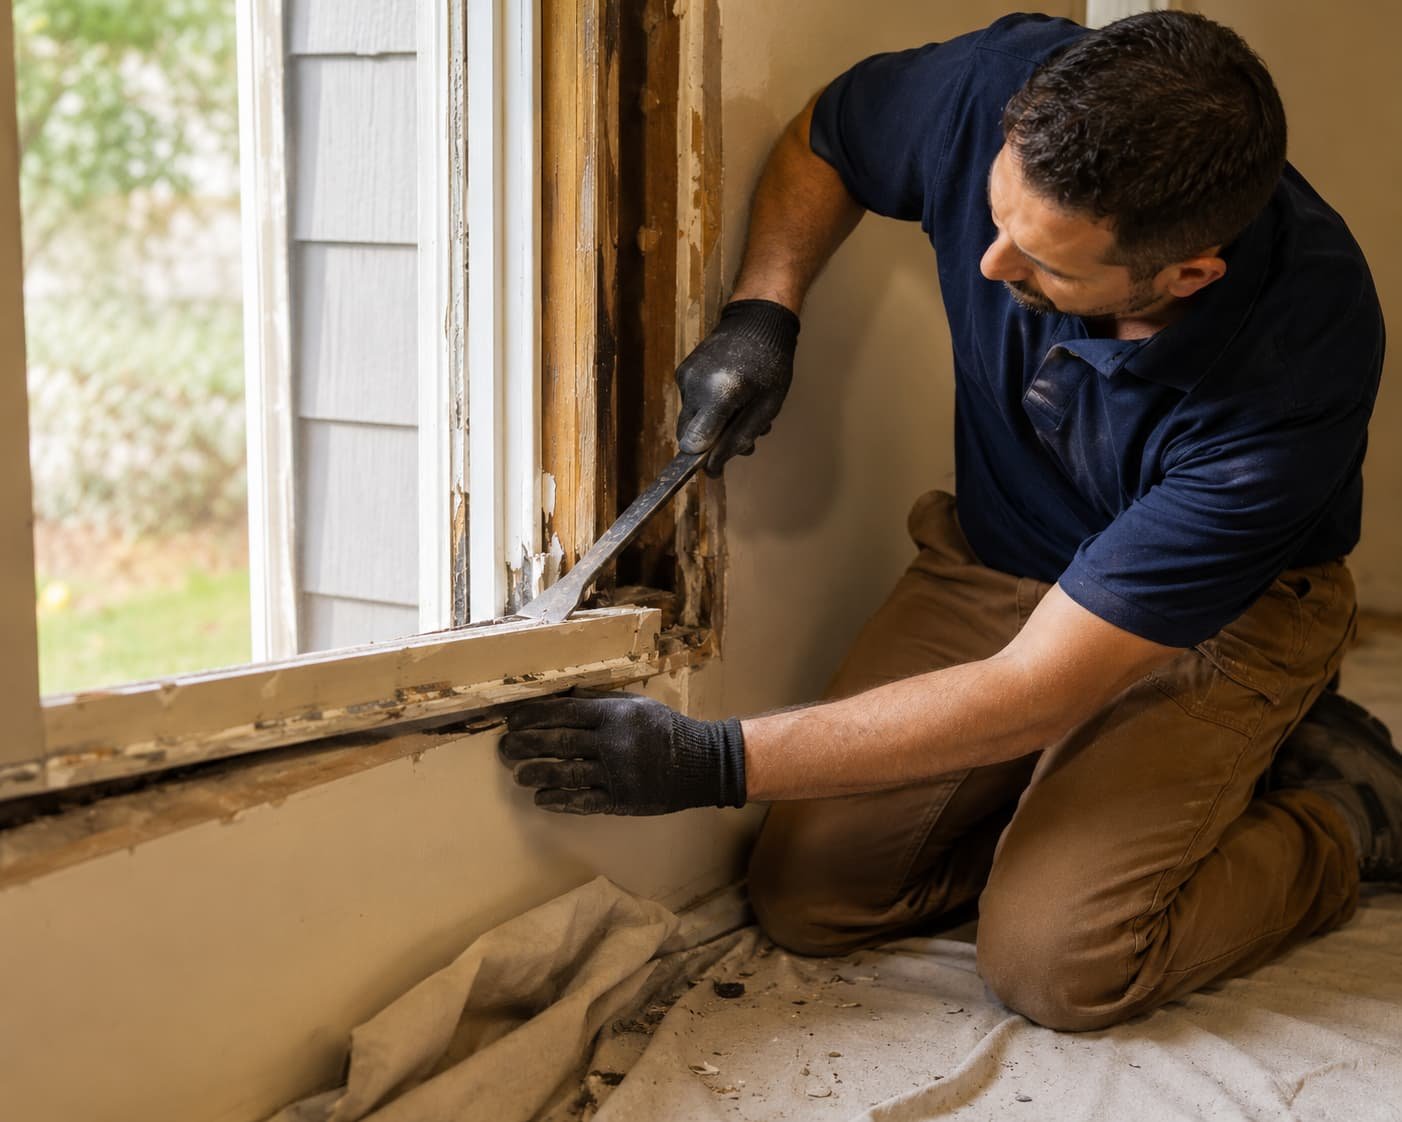
The existing window and its hardware are removed cleanly. For insert replacement, the existing frame remains in place and the old sash and glazing unit are removed. For full-frame replacement, the entire frame, sill, interior trim, and exterior casing are removed down to the rough opening. We protect the surrounding wall surface and interior finishes during removal — drop cloths are placed on interior floors and adjacent surfaces before any removal begins.
Step 2 — Inspect and Prepare the Opening
Once the existing window is out, the rough opening or existing frame is inspected. For insert replacement, we check that the existing frame is plumb, level, and square — minor adjustments are made where needed. For full-frame replacement, the rough opening framing is inspected for rot, water damage, and structural integrity. If anything unexpected is found at this stage — rot that was not visible during the estimate, water damage behind the frame — we stop, show you what we have found, and discuss the options before proceeding. We do not continue an installation into a compromised opening without your knowledge and agreement.
Step 3 — Install and Level the New Window
The new window unit is set into the opening and shimmed level, plumb, and square on all four sides. Correct shimming is one of the most important steps in the installation — a window that is not properly shimmed will bind, wear unevenly, and fail its weatherstripping seal prematurely. We check the shim placement on all four sides before anchoring the unit to the framing.
Step 4 — Insulate the Frame Gap
The gap between the window frame and the rough opening framing is filled with low-expansion foam insulation. This step is as important to the window’s thermal performance as the glass package itself — an uninsulated frame gap allows air infiltration that bypasses the glazing entirely. We use low-expansion foam specifically because standard expanding foam can bow the window frame if over-applied, distorting the sash alignment and compromising the seal.
Step 5 — Exterior Weatherseal
Exterior caulk is applied around the full perimeter of the window frame where it meets the exterior wall surface. We use a caulk rated for Augusta’s full temperature range — a product that remains flexible through the complete cycle of summer heat and winter cold rather than cracking and pulling away from the frame after one season.
Step 6 — Interior and Exterior Trim
Interior trim — the casing and stool that frame the window from inside the room — is reinstalled or replaced. For insert replacement, the existing interior trim typically remains in place. For full-frame replacement, new interior trim is fitted and finished. Exterior casing is reinstalled or replaced and painted where needed.
Step 7 — Operation Check
Every window is tested before we move to the next one. Sash operation — opening, closing, tilting in for cleaning — is checked for smooth, even movement. Lock engagement is verified. The weatherstripping seal is checked by feel around the full perimeter. A window that does not pass this check is adjusted before we leave that opening.
End of Day — The Final Walkthrough
At the end of the installation day, we walk through every window with you. You test each one — open it, close it, lock it. We show you how the tilt-in cleaning mechanism works on double hung units and how the crank operates on casement windows. Any questions about operation or maintenance are answered at this point. All old window materials, packaging, and installation debris are removed from the property before we leave.
After Installation — What to Expect
New windows sometimes require minor adjustment in the weeks after installation as the frame settles into the opening and the caulk cures fully. If a sash feels stiffer than it should or a lock does not engage cleanly after the first week, call us — these are minor adjustments that take minutes to correct and are covered under our workmanship guarantee.
The improvement in comfort is typically noticeable immediately — particularly in Augusta homes replacing single-pane or failed double-pane units. The reduction in utility bills shows in the first full billing cycle after installation, and becomes most apparent after the first complete Augusta summer with the new windows in place.
For independent performance data on every window we install, the National Fenestration Rating Council certifies U-factor and solar heat gain coefficients — we provide these ratings with every estimate so you know exactly what you are installing.
Augusta Window Pros serves Augusta, Evans, Martinez, Grovetown, Aiken SC, North Augusta SC, and Waynesboro. Call us or request a free estimate online to schedule your installation.